Theme Updates

We’re in the process of upgrading our site’s theme to be friendlier to mobile devices.  There are bound to be bugs here and there, but hopefully we will be able to work them out in short order.  We hope you like the changes.
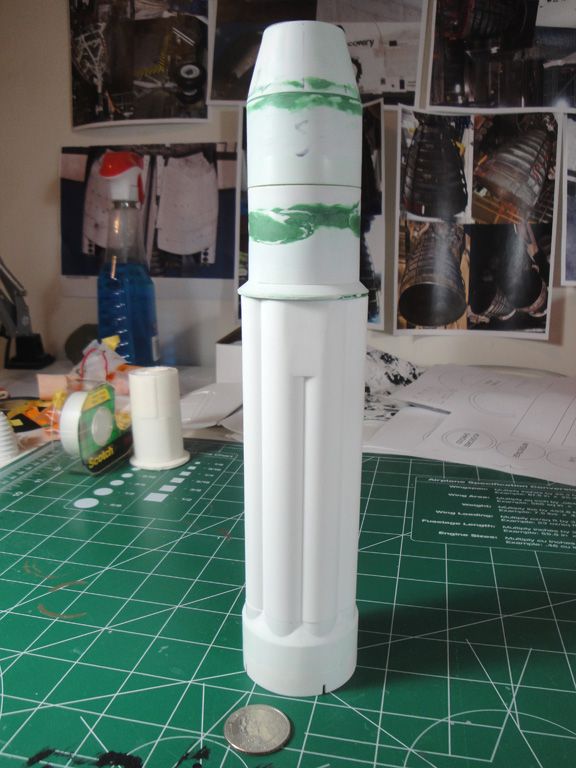
Link to Saturn I Build and 3D-Printed Parts

Brian Matney’s model of the Saturn I at USSRC is taking shape.

Brian Matney is in the process of kitbashing and scratch-building a 1:144 scale version of the Saturn I as it is displayed at USSRC, complete with support arms, using an Airfix Saturn IB kit as a base.  He has already ordered several new 3D-Printed detail parts from us through our Shapeways Shop, including a set of H-1 Engines and Support Arms.  You can find his build thread here:  http://www.arcforums.com/forums/air/index.php?showtopic=269382.

Saturn I in Google Earth (For Now)

saturn_blk2_google_earth Back in 2011 I modeled a simplified Saturn I Block II representative of the one in the rocket garden at the U.S. Space and Rocket Center in Huntsville, Alabama, using SketchUp.  I submitted it for use in the building layer of Google Earth, and for the moment, at least, it’s still there.  Google announced back in 2012 that it will progressively replace the 3D buildings layer with stereophotogrammetry-generated 3D imagery.  That means, of course, that my Saturn I’s days are numbered, which is a bit of a disappointment.  I fell in love with that Saturn back in 1981-82 during my first visit to the Space Center, and I felt privileged to have my SketchUp model appear in such a medium that might benefit such a wide audience.

The 3D Warehouse page for the model is here.  It can be downloaded and opened in SketchUp, but bear in mind that the model was intentionally made lower-resolution (less complex mesh) per the submission guidelines.

Some Web Trial and Error

If this web site looks kinda funky on occasion, it’s probably because I’m trying to hunt down a compatibility problem related to a gallery plugin that recently got rebuilt but has several bugs.  So if things looks weird, please be patient.  It won’t stay that way for long!

Comments Open for Blog & News

Just trying something out here…  I’ve enabled the comment forms for Blog & News entries in case someone has something they want to add.  All new comments will be moderated to start.  Hopefully I won’t get buried in excessive spam.  🙂

Oldie but a Goodie: James Duffy’s Little Joe I

If you haven’t done so, be sure to visit the project pages for James Duffy’s 1:17.44 scale Little Joe I model which flew at an FAI World Cup event in 2008.  James shows the process from start to finish, with plenty of info and photos to serve as inspiration.

And don’t forget the items James has for sale:  various aerospace DVDs, as well as his Spacemonkey Models V-2 plastic kit.  I’ve seen this kit up close, both unbuilt and completed; the quality is top-notch.

Projects in 2013

There are several projects that we are working on this year; we hope it will be a productive one:

Drawing Projects

  • Nike-Tomahawk Data Project.  Ever since 2004 when Dave Fitch met with Don Larson, an “old rocketeer” from NAR competitions past, Dave and I have been on-and-off sorting through Don’s collection of data regarding Nike-Tomahawk flight 18.26 IA to deal with data conflicts to ultimately present the rocketry community with an updated set of scale data drawings and photos.  I am hoping to finish my drawings in the next few months and will be talking to Tom Beach about an article for Sport Rocketry magazine.
  • Aeolus Scale Data.  In conjunction with Al Pizzo, I plan to finish updated scale data for future inclusion in a NARTS data packet.
  • Scale Drawings of Various Vehicles.  I have been working on and off with Marc McReynolds, a long-time NAR scale modeler and NARAM scale judge, on a series of drawing sets that may appear in future editions of Sport Rocketry.  Since Marc is in charge of this project, I’ll keep the details a secret, but I think you will be pleased with his selection of vehicles.

Possible Scale Kit

In addition to the various drawing projects, for the past several months we have been weighing the possibility of producing an Argo D-4 Javelin in 1:14 scale (that’s a BT-60 lower body tube) as a kit.  At this early stage of development, we plan on having laser-cut basswood fins (through-the wall for the large booster fins) and cast resin for the nose and perhaps for the transitions.  This would be a sport scale model with accurate part lengths and profiles but would not be a super-detailed kit.  Possible release dates would be late 2013 or sometime in 2014.  Whether or not we pursue this idea will depend on interest expressed by you, the potential customer, so feel free to let us know what you think!

netfabb for Fixing STL Files

When exporting STL files from TurboCAD (and most other 3D modeling programs), there will inevitably be errors in the tessellated surface that need to be fixed prior to uploading to a 3D-printing service such as Shapeways.  I have found netfabb Studio Basic to be an indispensable tool for correcting errors in STL files (not to mention that the program is FREE (UPDATE: Visit this link for changes to the way the free program is accessed); advanced editing tools are available in paid versions).  The following is typical of how I have been using the program to prepare STL files for printing:

  1. Save As .STL from TurboCAD (model was saved in standard inches).
  2. Open your STL file within netfabb. netfabb Studio Basic - open STL file
  3. Pull-Down Menu: Part/Convert Units/Inches to mm (netfabb assumes your STL units are millimeters by default.  If the part was modeled in inches, it will need to be scaled up accordingly). Convert Units | Inches to mm
  4. Repair Part (Red Cross Button).
  5. Automatic Repair. Repair Part
  6. Pull-Down Menu: Repair/Remove degenerate faces.  (NOTE:  You may need to experiment with the Tolerance settings here.  Lately, I have been using 0.002 with satisfactory results, though other models have required higher values, up to 0.02.  Keep in mind that smaller values yield a smoother mesh.) Remove degenerate faces
  7. Apply Repair (pop-up: Remove old part- YES).
  8. Pull-Down Menu: Part/Export Part — as STL (binary). Export Part | as STL (binary)
  9. Check the exported part by going to Pull-Down Menu: Project/New (Discard changes–YES), then open the updated file.

Additional Notes

For step 9, only one project is open at one time, so if you ‘Open’ with a project already active, you’ll just be adding a new object on top of an existing one.

I’ve noticed that if I try to export without performing step 6, I’ll typically get a warning and an opportunity to “fix” the part, which usually does okay, but sometimes the visual result can be unpredictable (with lots of added black lines, for example). So I’ve been doing the Step 6 even if I don’t see any noticeable red lines indicating degenerate faces; this seems to avoid the warning message during export (I suspect degenerate faces are present but are too small to display in the view).

Additionally, netfabb also has a cloud-upload automated repair you could try at their site, which is also free.

Faceter Settings / Resolution

Something else to consider (prior to exporting the STL file from TurboCAD or other CAD program) is the resolution of the surface of your 3D model.  Be sure to adjust whatever faceter settings (Options/ACIS/Faceter Mode in TurboCAD) to get decent resolution.  Recently, I have been using Custom Faceter Parameters with Surface tolerance set to 0.00007, 0.00015 or .0002 depending on the shape of the part and amount of fine detail (NOTE:  These values represent inches; metric drawings will require different settings).

TurboCAD ACIS Custom Faceter Parameters

I hope these steps take some of the frustration out of getting your models ready for 3D Printing.

Spacemodeling Rocketry R&D CAD Design